Hi, I’m Amanda, 35 years old, born and raised in the United States, and I’ll admit something right away—I didn’t learn cooking the traditional way. When my best friend sent me this Heart Shaped Brownies Recipe, she said, “You’ll love it.” She was right! I tried it that very evening, and the fudgy, chocolatey aroma filled my kitchen with joy. Go on, try it — and tell me if it reminds you of something your best friend would coo.
Why Heart Shaped Brownies Recipe?
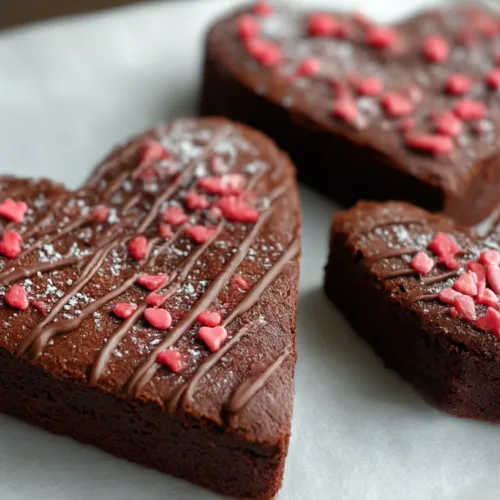
Heart-shaped brownies have a special charm. They’re perfect for showing love and affection — whether you’re baking for Valentine’s Day, an anniversary, or just to surprise someone special. I always find that desserts bring people together, and these brownies do exactly that. With their rich chocolate flavor and soft, fudgy texture, they’re more than just pretty — they’re irresistibly delicious.
Ingredients for Heart Shaped Brownies
Brownie Ingredients
- 1 cup unsalted butter – adds that buttery richness and keeps brownies moist.
- 2 cups granulated sugar – gives sweetness and helps create that shiny top.
- 4 large eggs – bind everything together and make the brownies tender.
- 1 teaspoon vanilla extract – adds warmth and depth of flavor.
- 1 cup all-purpose flour – provides structure without making them cakey.
- 1 cup unsweetened cocoa powder – gives that deep chocolate taste.
- 1 teaspoon baking powder – adds just enough lift.
- 1/2 teaspoon salt – balances the sweetness and enhances chocolate flavor.
- 1 cup chocolate chips (optional) – for those pockets of gooey chocolate.
Optional Toppings
- Powdered sugar – a simple dusting for elegance.
- Whipped cream – light and creamy contrast to the fudgy base.
- Fresh berries – for color and a burst of freshness.
How to Make Heart Shaped Brownies
Step 1: Prepare Your Pan
Preheat your oven to 350°F (175°C). Line a 9×9-inch baking pan with parchment paper, letting a bit hang over the edges for easy lifting later. This step makes cleanup easy and ensures your brownies come out perfectly.
Step 2: Melt the Butter
In a medium saucepan, melt the butter over low heat. Keep an eye on it — you want it melted, not browned. The aroma of butter melting is always the best way to start baking!
Step 3: Mix the Wet Ingredients
Pour the melted butter into a large bowl. Stir in the sugar until smooth and glossy. Add the eggs one at a time, mixing after each addition, then stir in the vanilla extract. The mixture should look thick and creamy.
Step 4: Combine the Dry Ingredients
In another bowl, whisk together the flour, cocoa powder, baking powder, and salt. Slowly fold the dry ingredients into the wet mixture until just combined. Don’t overmix — that’s the secret to a soft, fudgy texture.
Step 5: Add Chocolate Chips (Optional)
If you love double chocolate flavor, fold in the chocolate chips now. They melt slightly while baking, giving each bite that extra gooey surprise.
Step 6: Bake the Brownies
Pour the batter evenly into your prepared pan and smooth out the top. Bake for 25–30 minutes, or until a toothpick inserted in the center comes out with a few moist crumbs.
Step 7: Cool and Cut
Let the brownies cool in the pan for 10–15 minutes. Then lift them out using the parchment paper and place them on a cutting board. Use a heart-shaped cookie cutter to create adorable heart-shaped brownies.
Decorating Your Heart Shaped Brownies
After cutting, dust them with powdered sugar for a sweet, snowy finish. Or go a little extra — add whipped cream and a few fresh berries on top. They look stunning and taste even better.
Serving Suggestions
There’s no wrong way to enjoy these heart-shaped brownies — they’re made for moments of love and indulgence.
- Serve warm with a scoop of vanilla ice cream. The contrast between the cold, creamy ice cream and the warm, fudgy brownie is pure dessert bliss. As it melts, it creates a sweet little pool of vanilla sauce that soaks into every bite.
- Drizzle with chocolate or caramel sauce. A silky drizzle adds a touch of decadence and makes them look bakery-worthy with minimal effort.
- Add fresh strawberries or raspberries on top. Their natural tartness cuts through the richness of the chocolate, making each bite feel balanced and fresh.
- Pack in gift boxes for a sweet homemade treat. Wrap them in parchment and tie with ribbon for a heartfelt Valentine’s Day or holiday gift — they look charming and taste even better.
- Serve with coffee or hot cocoa. The warm drink pairs perfectly with the gooey, chocolatey texture of the brownies.
Heart Shaped Brownies Variations
Once you’ve mastered the classic recipe, it’s fun to play with flavors and textures. Here are a few cozy twists that keep the theme but change up the experience:
Nutty Brownies
Add chopped walnuts or pecans for a bit of crunch and depth. The nuts toast slightly as they bake, releasing a warm aroma that complements the chocolate beautifully.
Minty Brownies
Mix in a dash of peppermint extract or sprinkle mint chocolate chips on top before baking. The cool mint flavor against the fudgy chocolate is refreshing and festive — especially for winter holidays.
Fruity Brownies
Swirl in raspberry or strawberry jam before baking. The ribbons of jam bake into the batter, creating a soft, tangy surprise in every bite and giving the brownies a lovely marbled look.
Funfetti Heart Brownies
For something cheerful and playful, fold pink or rainbow sprinkles into the batter before baking. These make adorable Funfetti Brownie Bars — perfect for birthdays or Valentine’s Day parties.
Chocolate Fudge Lovers’ Brownies
Use dark cocoa powder and extra chocolate chips for a rich, indulgent version that melts in your mouth.
Tips for the Best Heart Shaped Brownies
Baking brownies is simple, but getting them perfectly fudgy takes a few thoughtful tricks:
- Don’t overmix the batter. Stir just until everything comes together — overmixing can make brownies tough.
- Use parchment paper. It makes lifting the brownies out of the pan easy and ensures clean edges for your heart-shaped cuts.
- Cool completely before cutting. Warm brownies are fragile; letting them rest keeps the shapes neat and defined.
- Check for doneness early. Every oven is different — brownies are best when slightly underbaked for that soft, chocolate-fudge center.
- Dust after cutting. Powdered sugar or cocoa dusting sticks better once the brownies are cool and adds a pretty finishing touch.
- Use quality cocoa. The deeper the cocoa flavor, the richer and more irresistible your brownies will taste.
Common Mistakes to Avoid
Even the best bakers slip up sometimes — here’s how to steer clear of the most common brownie blunders:
- ⚠️ Overbaking: This is the fastest way to lose that fudgy texture. Check your brownies a few minutes early and look for moist crumbs on the toothpick, not dry batter.
- ⚠️ Skipping parchment: Without it, brownies can stick to the pan or break while cutting. Always line your pan for smooth removal.
- ⚠️ Overmixing: Once you add flour, stir gently — too much mixing creates dense, chewy brownies.
- ⚠️ Cutting too early: If you cut before they cool, the brownies may crumble and lose their shape. Patience pays off!
- ⚠️ Ignoring edge vs. center baking: The edges cook faster — for even results, rotate your pan halfway through baking.
Storage & Reheating
Keeping your brownies fresh and fudgy is easy with the right storage:
- Fridge: Store in an airtight container for 3–4 days. Layer parchment between them to prevent sticking.
- Freezer: Freeze for up to 2 months in a sealed container or freezer bag. Thaw at room temperature for an hour before serving.
- Reheat: Warm in the microwave for a few seconds or in a low oven with a splash of water or milk to bring back moisture. They’ll taste freshly baked again!
Bonus tip: If you’re freezing them for gifts, cut and wrap each brownie individually — they’ll stay neat and are easy to share later.
Frequently Asked Questions
Q1: Can I use a heart-shaped pan instead of cutting them?
Absolutely! A heart-shaped brownie pan works perfectly and saves time. Just be sure to grease or line it so the brownies pop out cleanly.
Q2: Can I make these brownies ahead of time?
Yes! Bake them a day in advance, cool completely, and store covered. Wait to decorate or dust with sugar until right before serving for the freshest look.
Q3: Can I use boxed brownie mix for this recipe?
You can! A boxed mix makes a great shortcut. Just follow the package instructions, let them cool, then use heart-shaped cookie cutters to make them special.
Q4: How do I make them extra fudgy?
Use melted butter instead of oil, avoid overbaking, and slightly undercook the center. That’s the secret to soft, melt-in-your-mouth texture.
Q5: Can I add funfetti or pink sprinkles for Valentine’s Day?
Definitely! Add sprinkles before baking or scatter them on top while still warm for that Pink Heart Brownies sparkle. They’re festive, colorful, and perfect for Valentine’s baking parties.
Enjoying Your Heart Shaped Brownies
Baking heart-shaped brownies is more than just making dessert — it’s about creating joy and sharing love. Whether you’re baking them for someone special or just treating yourself, every bite is a reminder of warmth, sweetness, and connection.
Final Thoughts
There’s something magical about baking brownies that look as loving as they taste. Each batch feels like a small, edible reminder that simple acts of love — like baking — can brighten someone’s day. I hope this Heart Shaped Brownies Recipe becomes one of your new traditions too.
Heart Shaped Brownies
Equipment
- 9×9-inch baking pan
- Parchment Paper
- Mixing Bowls
- Saucepan
- Whisk
- heart-shaped cookie cutter
Ingredients
Brownie Ingredients
- 1 cup unsalted butter melted
- 2 cups granulated sugar
- 4 large eggs
- 1 tsp vanilla extract
- 1 cup all-purpose flour
- 1 cup unsweetened cocoa powder
- 1 tsp baking powder
- 1/2 tsp salt
- 1 cup chocolate chips optional
Optional Toppings
- powdered sugar for dusting
- whipped cream for serving
- fresh berries strawberries or raspberries
Instructions
- Preheat oven to 350°F (175°C). Line a 9×9-inch pan with parchment paper.
- Melt butter in a saucepan over low heat. Do not brown.
- In a large bowl, mix melted butter and sugar until smooth. Add eggs one at a time, then stir in vanilla extract.
- In another bowl, whisk flour, cocoa powder, baking powder, and salt.
- Fold dry ingredients into wet mixture until just combined. Do not overmix.
- Stir in chocolate chips if using.
- Pour batter into prepared pan and smooth the top. Bake for 25–30 minutes until a toothpick comes out with moist crumbs.
- Cool for 10–15 minutes. Lift from pan and cut with heart-shaped cookie cutter.
- Decorate with powdered sugar, whipped cream, or fresh berries as desired.