Oreo Dump Cake Easy and Fast is the ultimate quick dessert for chocolate lovers. With layers of crushed Oreos, creamy condensed milk, and fluffy whipped topping, this cake comes together in minutes and tastes like a dream. No mixing, no fuss just pure sweetness baked to perfection. It’s cozy, crowd-pleasing, and perfect for holidays, potlucks, or anytime you crave something indulgent yet effortless.
Why You’ll Love This Oreo Dump Cake Easy and Fast
This Oreo Dump Cake feels like something from a bakery, but it’s totally doable at home with just a few simple ingredients. It’s one of those Easy Dump Cake Recipes with 3 ingredients that proves dessert doesn’t need to be complicated. The rich chocolate flavor, creamy texture, and cookie crunch make it perfect for celebrations—from Easy New Year’s Eve Desserts to relaxed family dinners.
It’s quick, forgiving, and fun to make. And best of all, it gives you that nostalgic, cookies-and-cream flavor everyone loves.
Ingredients
- Oreo Cookies – Classic chocolate or vanilla; crunchy and rich.
- Sweetened Condensed Milk – Adds creamy sweetness that binds everything.
- Whipped Topping (Cool Whip) – Light, airy layer that softens the richness.
- Chocolate Cake Mix – Fudgy and deep chocolate flavor; any brand works.
- Salted Butter – Balances the sweetness with a hint of salt.
Directions
- Prepare your baking dish.
Spray a 9×13-inch pan with cooking spray to prevent sticking. This makes cleanup effortless and keeps the edges perfectly soft. - Layer the Oreos.
Arrange the cookies in a single layer on the bottom of your dish. Don’t worry about perfection—uneven layers just add texture. - Add the condensed milk.
Pour the sweetened condensed milk evenly over the Oreos. You’ll see it slowly seep into the cookies, forming a luscious, creamy base. - Spread the whipped topping.
Use thawed Cool Whip for this step. Gently spread it across the condensed milk until everything is coated in a smooth, fluffy layer. - Sprinkle the cake mix.
Without mixing, evenly sprinkle the dry chocolate cake mix over the top. It may look messy, but trust the process—it bakes into a magical crust. - Top with butter.
Slice the salted butter into thin pieces and place them evenly over the dry cake mix. The butter melts down, creating that golden, gooey top. - Add more Oreos.
Chop a few extra cookies and sprinkle them across the surface for crunch and visual appeal. - Bake and serve.
Bake at 350°F for about 35–40 minutes, until the top is bubbly and the edges are crisp. Serve warm with ice cream and a drizzle of chocolate sauce for pure dessert bliss.
Cultural or Technique Note
Dump cakes are a classic American shortcut dessert—born from the idea that homemade baking should be quick, comforting, and delicious without complicated steps. This Oreo version takes that tradition and gives it a modern, trendy twist that feels right at home among the fun, viral bakes of 2025.
Serving Suggestions
Serve Warm with Ice Cream
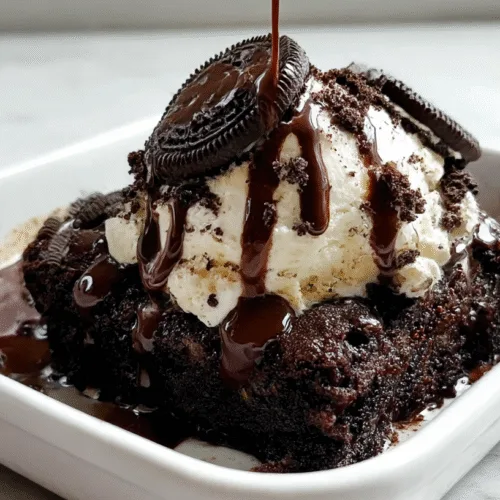
Straight out of the oven, this Oreo Dump Cake is pure chocolate bliss. The edges turn slightly crisp while the center stays gooey and molten—like the heart of a brownie sundae. Top it with a scoop of vanilla ice cream and a drizzle of chocolate syrup, and you’ve got a dessert that melts beautifully into every bite.
Chill It for a Fudgy Texture
If you prefer a denser, brownie-like treat, let the cake cool completely and chill it for a few hours. Once cold, the condensed milk and whipped topping create a firm, truffle-like layer that’s rich and creamy—perfect for slicing and serving at parties or potlucks.
Add a Festive Twist
For the holidays, sprinkle crushed peppermint candies on top for a Christmas Dump Cake vibe. The minty crunch adds color and a refreshing contrast to the chocolate layers. It’s a hit at cookie swaps and holiday dinners!
Ideal for Any Gathering
This dessert is also perfect for Easy Tailgate Desserts or casual get-togethers. It travels well, serves a crowd, and tastes just as delicious warm or cold. Bring it to your next potluck or family movie night—it’s guaranteed to disappear fast.
Pro Tips for Success
- Use thawed whipped topping. Frozen Cool Whip won’t spread evenly and can make the top uneven as it bakes. Let it soften in the fridge first.
- Don’t stir the layers. The beauty of a dump cake is that each ingredient bakes into its own delicious layer. Mixing ruins that gooey texture.
- Line your pan with parchment. This trick makes cleanup simple and helps lift the cake out neatly if you want to serve perfect squares.
- Add extra Oreos on top. For a crunchier finish, sprinkle a few crushed Oreos over the cake during the last 10 minutes of baking.
- Let it rest before serving. Give your cake about 10 minutes after baking to settle and set—it’ll be easier to scoop and serve.
- Drizzle chocolate syrup before baking. This deepens the flavor and adds a molten chocolate layer that feels downright luxurious.
Common Mistakes to Avoid
- Overbaking: The cake can dry out quickly, so start checking at 35 minutes. The center should look slightly soft.
- Skipping butter: The melted butter is what gives this cake its irresistible gooey texture—don’t leave it out!
- Mixing the layers: Resist the urge to stir; this dessert works best when the layers bake into each other naturally.
- Using frozen Cool Whip: Always thaw completely for smooth spreading and even texture.
- Not greasing the pan: A quick spray of cooking oil saves your cake (and your cleanup).
Storage & Reheating
Fridge: Store leftovers in an airtight container for up to 3–4 days. The texture stays moist and rich.
Freezer: Freeze in sealed containers or wrap portions tightly for up to 2 months.
Reheat: Warm gently in the oven or microwave with a splash of milk or cream to bring back that soft, gooey texture.
Frequently Asked Questions
Q1: Can I use different flavors of Oreos?
: Definitely! Vanilla, mint, or peanut butter Oreos all taste incredible here. Each flavor adds a unique twist, so don’t be afraid to experiment.
Q2: Can I make this ahead of time?
: Yes! Bake it the day before, cover it tightly, and store it in the fridge. Reheat before serving or enjoy it cold for a fudgy bite.
: What kind of cake mix works best?
A3: Chocolate fudge cake mix gives the richest flavor, but vanilla, red velvet, or devil’s food cake mix all work beautifully too.
Q4: Can I use homemade whipped cream instead of Cool Whip?
: You can! Just make sure it’s lightly sweetened and stable enough to hold during baking. Fresh whipped cream adds a slightly lighter flavor.
Q5: What toppings go well with Oreo Dump Cake?
Vanilla ice cream, chocolate syrup, caramel drizzle, or crushed Oreos make this dessert extra special. For a party, try topping with whipped cream and mini cookies!
Closing Paragraph
This Oreo Dump Cake is the perfect balance of rich chocolate, creamy sweetness, and cookie crunch—all in one simple dessert. Whether you’re making it for a party or a cozy night at home, it’s sure to be a hit. Try it once, and you’ll find yourself coming back to this easy recipe again and again.
Final Thoughts
When I first made this Oreo Dump Cake, I couldn’t believe how something so easy could taste this decadent. It’s warm, melty, and just the right kind of indulgent for when you need a pick-me-up. If you love desserts that feel both nostalgic and modern, this one’s for you.
Oreo Dump Cake Easy and Fast
Equipment
- 9×13-inch Baking Dish
- Oven
- Cooking Spray
Ingredients
Main Ingredients
- Oreo cookies classic or flavored, plus extra for topping
- 1 can sweetened condensed milk typically 14 oz
- 1 tub whipped topping (Cool Whip) thawed, 8 oz
- 1 box chocolate cake mix dry, any brand
- 1/2 cup salted butter thinly sliced
Instructions
- Preheat the oven to 350°F (175°C). Spray a 9×13-inch baking dish with cooking spray.
- Layer Oreo cookies evenly on the bottom of the dish.
- Pour the sweetened condensed milk over the cookies.
- Spread thawed whipped topping (Cool Whip) evenly over the milk.
- Sprinkle dry chocolate cake mix evenly over the top—do not stir.
- Place thin slices of salted butter over the top of the cake mix.
- Sprinkle a few crushed Oreos on top for extra crunch.
- Bake for 35–40 minutes, until bubbly and golden around the edges. Let rest 10 minutes before serving.